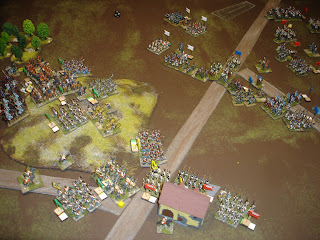
On 17 August we played the Leipzig Table D scenario, the
next in the sequence for the Battle of Nations.
Both sides march on, although the allies have the upper hand in being deployed
and closest to the two victory locations: Gross Possna and Klomberg Hill.
By the 10:00 turn the allies (Austrians in this case) had
moved through Gross Posna (orange roofed building with the unit of jagers in the top left hand corner) and
had pushed on to the hill (the two brigades of Grenz). The cavalry is on react ready to move up as
well. I had unlimbered the artillery too early and was busy force marching it
up (the first time I had used this optional rule), but it was hard work keeping it in command.
The Austrian 2nd Division (denoted by the red marker flags)
is covering the right and moving up on Srippertshayn as a brigade of French veteran
Light Infantry are about to occupy it.
By 12:00 the Austrians were all over Klomberg Hill. The French were at a disadvantage as their cavalry
was still coming up, although their 12pdrs were more than a match of the Austrian
6pdrs.
The Austrians in Srippertshayn as seen from the French lines. Sadly I didn’t get the focus right on the
unit I wanted, being one of my two Austrian infantry units I had bought along
for the game (easily spotted by the cast flags which have been hand painted). These are Essex. All the other figures are Old Glory form
Richard’s collection, with the exception of the Prussians which are ABs and
mine.
The Austrians launched one attack from the hill as the
French were getting ready to attack.
When their attack did go in they were met by the Prussians and a cataclysmic
die roll out come of 10 to 1, not in their favour. A that point we called it quits.
We were not using free rolls, and as the French would have had a maximum of only two for the game, they would have probably already been used by this stage of the game.


No comments:
Post a Comment